Archive for the ‘java’ Category

h1

Adding a Java Platform to NetBeans Under Mac OS X

October 13, 2007

This article describes how to add a Java Platform to NetBeans under Mac OS X. This enables you to compile and run your applications under different virtual machines and also to associate Javadocs and source code with a Java platform so that they can be used by NetBeans for code generation and in-context tips and documentation.

These steps assume that you are running NetBeans 6

  1. Select Tools -> Java Platform
  2. Click the Add Platform… button. This will open the Add Java Platform window. Here you will seen all of the Java Platforms that are installed your system.
  3. Drill down until you find the Home folder. Select it and click the Next button.
  4. If you have locally stored copies of source or Javadocs you can associate those with the platform using the Browse buttons. Click the Finish button when you’re done.
  5. Click the Close button.
  6. You can now select this platform for a project by right-clicking a project and selecting Properties. The setting is under the Libraries node.
  7. Finished

Screenshots:

Java Platform ManagerAdd Java PlatformAdd Java Platform 2Project Properties Library

    h1

    Application Monitoring with JConsole

    January 31, 2007

    Introduction

    Hidden in the bin directory of the JDK distribution are some little known, but useful tools. In this article we’ll look at the basics of using jconsole to monitor threads, memory usage and object creation.

    Setting Your App Up to Be Monitored

    If you’re running Java 6, you’re all good to go. The option to allow your application to be monitored is on by default. Skip to the section entitled Launching JConsole and collect 100 points for being on the cutting edge.

    If you’re on Java 1.42 or earlier, do not pass go, or collect $200. Time to upgrade. JConsole requires Java 5 or later.

    If you’re on Java 5, then you need to start the application that you want to monitor while passing an extra flag to the JVM to enable monitoring. For our example we’re going to launch the SwingSet demo that comes with the JDK. If you’re on Windows, Linux or Solaris it’s usually located in %JDK_HOME%/demo/jfc/SwingSet2. If you’re on Mac OS X, it’s usually in /Developer/Examples/Java/JFC/SwingSet2.

    Launching the Application to be Monitored

    If you’re launching the application from the command line, simply add -Dcom.sun.management.jmxremote=true right after the java command. Like this:

    java -Dcom.sun.management.jmxremote=true -jar SwingSet2.jar

    If you’re launching the application from within Eclipse, select Run -> Run…, click on the Arguments tab and specify -Dcom.sun.management.jmxremote=true in the VM arguments field.

    If you’re launching the application from within NetBeans, select the Project, right-click and select Properties, select Run node and specify -Dcom.sun.management.jmxremote=true in the VM Options field.

    Launching JConsole

    JConsole comes with the JDK (not the JRE) and can be found in %JDK_HOME%/bin on Windows, Solaris and Linux and in /System/Library/Frameworks/JavaVM.framework/Versions/1.5/Commands on Mac OS X. To launch it, open a terminal or command window, change to the directory containing it and execute jconsole. This should open a window that looks like this:

    Jconsole Start

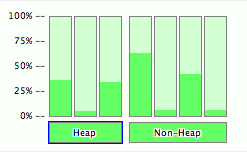
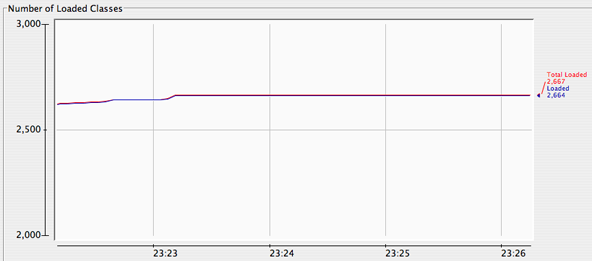
    Click the Connect button to begin monitoring your app. As you can see from the screenshots below you can can view summary information, threads usage, memory usage, current and total classes loaded.

    Jconsole Summary

    Jconsole Threads

    Jconsole Memory

    Jconsole Classes

    The information provided by jconsole is invaluable when tracking down thread creep or memory leaks. It works great to monitor an app while putting it through its paces or when leaving it to run over the weekend to ensure there aren’t any uphill graphs. It’s easy, free and doesn’t require any extra work during application development.

    Joshua Smith

    Technorati Tags: , , , ,

    h1

    Not All Assignments are Created Equal

    January 30, 2007

    Many introductory Java books will tell you that the compound assignment operators (e.g. b += 1) are just a shorthand for doing an assignment where something is assigned the result of itself involved in some arithmetic operation (e.g. b = b + 1). In this article we’ll see that the difference between compound operators and their supposed expanded versions can be the difference between running and failing to compile.

    These are supposed to be equivalent right?

    
    byte b1 = 0;
    b1 = b1 + 1;
    
    byte b2 = 0;
    b2 += 1;
    

    Well, that’s what a lot of books will tell you. For many cases they’re very close to equivalent and it’s certainly a fair way to describe them to a junior programmer that is just being exposed to compound operators for the first time. Once you start studying for the Sun Certified Java Programmer (SCJP) test or just dig a little deeper into the language you find that there is a subtle, yet important difference.

    This will not compile:


    byte b1 = 0;
    b1 = b1 + 1;

    Why not? It looks pretty straightforward. The reason lies in how Java handles integer arithmetic. All integral expressions in Java result in at least an int. That means that if the operations involve a long they’ll result in a long, but if they involve ints, shorts or bytes (the integral types that are smaller than a long) they will still result in an int. Since an int does not fit in a byte, it fails at compile time.

    On the other hand, this compiles fine:


    byte b2 = 0;
    b2 += 1;

    So why does that work? Isn’t it pretty much the same thing as the code above that won’t compile? It turns out that Java inserts an implicit cast when the compound operator is used. The compound assignment is actually translated to something like this:


    byte b2 = 0;
    b2 = (byte)(b2 + 1);

    The implicit cast handles the problem of narrowing that comes from assigning an int (32 bits) to a byte (8 bits).

    Joshua Smith

    References


    SCJP Sun Certified Java Programmer Study Guide

    Technorati Tags: ,

    h1

    main() Methods in Java

    January 29, 2007

    Introduction

    The main() method is probably one of the most familar structures in the Java language. It can easily be auto-generated in Eclipse by typing “main” followed by Ctrl-Space and in NetBeans by typing “psvm” followed by a space. It’s the entry point into thousands of applications and while it’s familiar, it also has a few hidden secrets. In this article we’ll look at more than a dozen variations of the main() method. Some will compile and run as expected. Others will not compile at all. Still others will compile and run, but can’t be used as an entry point into an application.

    The Methods

    Look at the methods below. Which ones will not compile? Which ones will compile, but can’t be used as entry points into an application? Which ones compile and act as you would expect a main method to act?

    
    public static void main(String[] args) {
        System.out.println("Main1!");
    }
    
    public static void main(String[] someOtherName) {
        System.out.println("Main2!");
    }
    
    public static void main(String... args) {
        System.out.println("Main3!");
    }
    
    public static void main(String[] args)
      throws Exception {
        System.out.println("Main4!");
    }
    
    static void main(String[] args) {
        System.out.println("Main5!");
    }
    
    public void main(String[] args) {
        System.out.println("Main6!");
    }
    
    public static void main(String args[]) {
        System.out.println("Main7!");
    }
    
    public static void main(String[] args[]) {
        System.out.println("Main8!");
    }
    
    public static void main(String[][] args) {
        System.out.println("Main9!");
    }
    
    public static void main(String args) {
        System.out.println("Main10!");
    }
    
    public static void main(String[] args)
      throws IOException {
        System.out.println("Main11!");
    }
    
    static public void main(String[] args) {
        System.out.println("Main12!");
    }
    
    public strictfp static void main(String[] args) {
        System.out.println("Main13!");
    }
    
    void public static main(String[] args) {
        System.out.println("Main14!");
    }
    
    public static void main(int[] args) {
        System.out.println("Main15!");
    }
    
    public static void main(String[] args) {
        System.out.println("Main16!");
    }
    
    public static void Main(String[] args) {
        System.out.println("Main17!");
    }


    The Answers


    /**
     * Fine.
     * 
     * This is the most common form of the main method.
     */
    public static void main(String[] args) {
        System.out.println("Main1!");
    }
    
    /**
     * Fine.
     * 
     * This is the most common form of the main method except
     * that the variable accepting command line arguments has
     * been renamed to someOtherName. The name of the variable
     * is insignificant.
     */
    public static void main(String[] someOtherName) {
        System.out.println("Main2!");
    }
    
    /**
     * Fine.
     * 
     * Varargs form of the main method. New with Java 5.
     */
    public static void main(String... args) {
        System.out.println("Main3!");
    }
    
    /**
     * Fine.
     * 
     * This is the most common form of the main method, except
     * that it throws an exception. This is completely valid.
     */
    public static void main(String[] args)
      throws Exception {
        System.out.println("Main4!");
    }
    
    /**
     * Compiles, but cannot be executed from the command line.
     * 
     * Method must be public.
     * 
     * Since the signature doesn't match it's a completely
     * different method that just happens to be called main.
     * 
     */
    static void main(String[] args) {
        System.out.println("Main5!");
    }
    
    /**
     * Compiles, but cannot be executed from the command line.
     * 
     * Method must be static.
     * 
     * Since the signature doesn't match it's a completely
     * different method that just happens to be called main.
     * 
     */
    public void main(String[] args) {
        System.out.println("Main6!");
    }
    
    /**
     * Fine.
     * 
     * This is the most common form of the main method
     * except that the square
     * brackets for the String array have been put beside
     * the variable. This is valid, but many think, harder
     * to read.
     */
    public static void main(String args[]) {
        System.out.println("Main7!");
    }
    
    /**
     * Although the syntax is strange, this compiles, but
     * cannot be executed from the command line.
     *
     * This is the most common form of the main method, but
     * the square brackets for the args array are beside the
     * type as well as beside the args variable. They should
     * be beside one or the other, not both.
     *
     * While I would have guessed that this would not
     * compile at all, it turns out that this is equivalent
     * to main taking a two-dimensional array as a parameter.
     * String[] args[] is the same as String[][] args or String
     * args[][]. While it's certainly valid for a method to
     * accept a two-dimensional array of Strings, this does
     * not fit the required signature for a main method
     * that is to be invoked from the command line. Attempting
     * to execute this will result in the following error
     * message: Exception in thread "main"
     * java.lang.NoSuchMethodError: main
     *
     */
    public static void main(String[] args[]) {
        System.out.println("Main8!");
    }
    
    /**
     * Compiles, but cannot be executed from the command line.
     *
     * The main() method needs to accept an array of Strings
     * as a parameter. The method below accepts a
     * two-dimensional array of Strings.
     *
     * Since the signature doesn't match it's a completely
     * different method that just happens to be called main.
     *
     */
    public static void main(String[][] args) {
        System.out.println("Main9!");
    }
    
    /**
     * Compiles, but cannot be executed from the command
     * line.
     *
     * The main() method needs to accept an array of Strings
     * as a parameter. The method below accepts a single
     * String called args.
     *
     * Since the signature doesn't match it's a completely
     * different method that just happens to be called main.
     *
     */
    public static void main(String args) {
        System.out.println("Main10!");
    }
    
    /**
     * Fine.
     * 
     * Throwing a checked exception, like IOException,
     * is legal.
     * 
     */
    public static void main(String[] args)
      throws IOException {
        System.out.println("Main11!");
    }
    
    /**
     * Fine.
     * 
     * This is the most common form of the main method except
     * that static and public keywords are reversed. Their
     * order does not matter.
     * 
     */
     static public void main(String[] args) {
        System.out.println("Main12!");
    }
    
    /**
     * Fine.
     * 
     * It's perfectly acceptable to have a strictfp main
     * method.
     * 
     */
    public strictfp static void main(String[] args) {
        System.out.println("Main13!");
    }
    
    /**
     * Does not compile.
     * 
     * The return type (void in this case) must come
     * immediately before the method name.
     * 
     */
     void public static main(String[] args) {
        System.out.println("Main14!");
    }
    
    /**
     * Compiles, but cannot be run from the command line.
     *
     * The main() method must accept an array of Strings,
     * not ints, as a parameter.
     *
     * Since the signature doesn't match it's a completely
     * different method that just happens to be called main.
     *
     */
    public static void main(int[] args) {
        System.out.println("Main15!");
    }
    
    /**
     * Fine.
     * 
     * This is the most common form of the main method
     * except that there aren't any spaces between the
     * type, the square brackets and the variable name.
     * It's still legal.
     *
     */
    public static void main(String[] args) {
        System.out.println("Main16!");
    }
    
    /**
     * Compiles, but cannot be run from the command line.
     *
     * The main() method must be all lower case.
     *
     * Since the signature doesn't match it's a completely
     * different method that just happens to be called main.
     *
     */
    public static void Main(String[] args) {
        System.out.println("Main17!");
    }
    

    So why would you want to know so much about the main() method anyway? Well, besides being essential if you’re taking the Sun Certified Java Programmer (SCJP) exam, there are a few alternate formulations of the method that might come in handy. Plus, with the examples above it mind, I bet you’ll spot a flawed main() method quicker than most if you come across one.

    Joshua Smith


    References


    SCJP Sun Certified Java Programmer Study Guide

    Technorati Tags: ,

    h1

    Varargs and Behavior of Method Arguments

    January 27, 2007

    Varargs and Behavior of Method Arguments

    Varargs

    Java 5 brings a convenient new construct to Java that lets a method take zero or more arguments of a given primitive or type. It’s call variable arguments or varargs. In this article we’ll deal with some questions that the introduction of varargs brings up regarding the behavior of method arguments.

    A varargs method can be called with zero, one or many individual arguments or with a single array. After the method is called, the arguments are accessed internally using the familiar square brackets array syntax. It looks like this:

    public class BasicVarargs {
        public static void main(String[] args) {
            myMethod(); // zero arguments are fine
            myMethod(0); // one argument is fine
            myMethod(0, 1); // multiple arguments are fine
            myMethod(new int[] {0, 1, 2}); // array of args is fine
        }
        static void myMethod(int... myArgs) {
            System.out.println(myArgs[0]);
            System.out.println(myArgs[1]);
            // etc
        }
    }
    

    The Issue

    This raises a significant question if you’re taking the Sun Certified Java Programmer (SJCP) exam or just want to be knowledgeable about how method parameters are treated. A single argument (whether a primitive or an object reference) cannot be reassigned within a method. Passing a primitive into a method and assigning it a different value will leave the primitive in the calling method unchanged. Passing an object reference into a method and then reassigning the references will, likewise, leave the reference in the calling method unchanged. Objects however, including arrays, have an associated caveat. While the reference to the object cannot be reassigned, the method can use the copy of the reference to alter the content of the object. For a non-array object, this means its instance fields. For an array, this means the primitives or object references at each of its indices. That brings us to our question: If methods with varargs access those arguments as if they were an array, does that mean that they can change the value of a primitive or reassign an object reference that’s held at any given array index? That’s the issue we’re about to explore.

    Review of Primitive Argument Behavior

    As a quick review, what’s the output of the following?

    public class PrimitiveArgBehavior {
    	static int myInt = 0;
    	public static void main(String[] args) {
    	    System.out.println(myInt);
    		intMethod(myInt);
    		System.out.println(myInt);
    	}
    	private static void intMethod(int someInt) {
    		someInt++;
    	}
    }

    Output:


    0
    0

    myInt remains unchanged. intMethod() works on a copy of myInt and that copy loses scope at the end of intMethod().

    Review of Array Reference Argument Behavior

    What’s the output of the following?

    public class ArrayReferenceArgBehavior {
        static int[] myIntArray = {0};
        public static void main(String[] args) {
            System.out.println(myIntArray[0]);
            intArrayMethod(myIntArray);
            System.out.println(myIntArray[0]);
        }
        static void intArrayMethod(int[] someIntArray) {
            someIntArray = new int[] {1};
        }
    }

    Output:


    0
    0

    myIntArray remains unchanged. intArrayMethod() works on a copy of the myIntArray reference and that copy loses scope at the end of intArrayMethod(). intArrayMethod() is prevented from reassigning the original reference.

    Review of Array Contents Argument Behavior

    What’s the output of the following?

    public class ArrayContentsArgBehavior {
        static int[] myIntArray = {0};
        public static void main(String[] args) {
            System.out.println(myIntArray[0]);
            intArrayMethod(myIntArray);
            System.out.println(myIntArray[0]);
        }
        static void intArrayMethod(int[] someIntArray) {
            someIntArray[0]++;
        }
    }

    Output:


    0
    1

    In this case the value did change. While the array reference itself cannot be reassigned to point to another array, the elements of the array can be changed.

    Varargs Behavior With Primitives and Arrays

    So now we go on to the tricky varargs method. What’s the output of the following?

    public class VarArgsBehavior {
    	static int myInt = 0;
    	static int[] myIntArray = {0};
    	public static void main(String[] args) {
    		System.out.println("myInt before: " + myInt);
    		intVarArgsMethod(myInt);
    		System.out.println("myInt after: " + myInt);
    		System.out.println("myIntArray before: " + myIntArray[0]);
    		intVarArgsMethod(myIntArray);
    		System.out.println("myIntArray after: " + myIntArray[0]);
    	}
    	static void intVarArgsMethod(int... someVarArgsInt) {
    		someVarArgsInt[0]++;
    	}
    }

    Now you see why it’s a little unclear? The first call is using an int. The second call is using an array of ints. In either case though, the intvarArgsMethod() is using array syntax to deal with the arguments. So how does it behave when called with individual primitives? Are they treated like individual primitives or like they were placed into an array before the method call?

    The output:


    myInt before: 0
    myInt after: 0
    myIntArray before: 0
    myIntArray after: 1

    Thankfully, the developers that implemented varargs kept the behavior consistent. Even though vararg parameters are accessed in a manner that makes them look like elements of an array, they are still treated in accordance with how they are declared. Kudos to the varargs implementation team. They could very easily have decided to just handle the argument like an array at all times and that would have resulted in some very odd behavior in special cases.

    Conclusion

    Bottom line, expect varargs to treat an argument in the manner in which it was declared. If a varargs method is called with an array, its arguments will be treated like an array. If called with one or more individual arguments, they will be treated like individual arguments. Varargs respects the manner in which a method is called.

    Joshua Smith


    References


    Sun Guide to Varargs


    SCJP Sun Certified Java Programmer Study Guide

    Technorati Tags: , ,

    h1

    java.io.tmpdir Inconsitency

    January 26, 2007

    Summary

    A description of a platform inconsistency in Java that can cause problems when building file paths that use the temp directory.

    The Temp Directory

    Java has a way of giving you the path to the temp directory in a platform neutral way. You simply ask the system for the “java.io.tmpdir” property and you’re good to go. Here’s an example of code that does that and prints the result.

    The Code

    
    package tmp;
    public class TempDir {
      public static void main(String[] args) {
        String tmpDir = System.getProperty("java.io.tmpdir");
        System.out.println("java.io.tmpdir: [" + tmpDir + "]");
      }
    }
    

    The Output

    On Windows: java.io.tmpdir:[C:\DOCUME~1\joshua\LOCALS~1\Temp\]

    On Solaris: java.io.tmpdir:[/var/tmp/]

    On Linux: java.io.tmpdir: [/tmp]

    On Mac OS X: java.io.tmpdir: [/tmp]

    As you can see, it gives you the temp directory that is appropriate to the platform. Now you just use it. Well, almost. Take a look at those paths again. The Linux and Mac OS X ones vary slightly from the others. Not much, but just enough to cause your application to fail if you don’t take precautions. You see it? Yep, the Linux and Mac OS X output don’t end in the file separator (forward slash)! So when you build paths using code like the following…

    
    String myPath = System.getProperty("java.io.tmpdir") + "some"
      + File.separator + "place" + File.separator + "somefile.txt");
    

    …they fail.

    On Windows:C:\DOCUME~1\joshua\LOCALS~1\Temp\some\place\somefile.txt

    On Solaris: /var/tmp/some/place/somefile.txt

    On Linux: /tmpsome/place/somefile.txt

    On Mac OS X: /tmpsome/place/somefile.txt

    tmp and some get slammed together on Linux and Mac OS X as tmpsome without the file separator between them. This means that if you want to use the java.io.tmpdir property to build a path, you have to check for the file separator at the end of the String and add it if it’s not there.

    The other option is just to add the File.separator no matter what when building paths with java.io.tmpdir. In limited tests on Windows, Solaris, Linux and Mac OS X it looks like the operating system handles doubled file separators without problems. It simply swallows the second one and acts as if it was a single file separator.

    Real World

    So where would this come up? Actually, the reason that I came across it is that I’ve started using the temp directory more often in applications when I need a throw away space. The temp directory is especially useful when used in coordination with the java.io.File.deleteOnExit() method. This method lets you delete a file referenced by a java.io.File reference when the JVM exits. This is very nice when you only need a file for the duration of the running of the application. While I tried to avoid direct file IO in unit testing by using streams and the like, if you are testing classes whose primary function is file IO, then you really need to touch the disk to test effectively. In these cases I usually create a directory within the temp directory and create test files there that will either be deleted in my JUnit tearDown() method or, at the very least, when the JVM exits.

    Bug or Feature?

    So why do Linux and Mac OS X vary in this case? Is it a bug in the Linux and Mac OS X implementations of the JDK? Or a bug in the Windows and Solaris implementations? Not according to Sun. I did a little digging and it seems that someone else discovered this little annoyance and reported it as a bug. The state of the issue is “Closed, not a bug”. A feature then? I guess. Touching the system with things like System.getProperty() is always problematic, but it seems that these properties should have been defined a little more rigorously so the inconsistency wouldn’t be there. In any case, hopefully people will run across this “feature” with a search engine hitting on this blog entry instead of at 5pm on a Friday when they try to run their polished Java app on Linux or Mac OS X and it fails due to a missing forward slash.

    Joshua Smith

    Resources:

    Java Application Development on Linux at Amazon

    Java Programming on Linux at Amazon

    Mac OS X for Java Geeks at Amazon

    Keywords:

    java java.io.tmpdir System.getProperty temporary temp tmp directory platform consistency inconsistency Linux Mac OS X Windows Solaris

    Technorati Tags:

    h1

    Coding Standard: String Literals and equals()

    January 25, 2007

    Coding Standard:

    Use “some String literal”.equals(myString) instead of myString.equals(“some String literal”).

    Justification:

    It saves a null check.

    Example of Violation:

    String myString = getSomeString();
    if ((myString != null)
      && (myString.equals("some String literal"))) {
        // do something important
    }

    Example of Correction:

    String myString = getSomeString();
    if ("some String literal".equals(myString)) {
      // do something important
    }

    Explanation:

    When calling the equals method on a String object, there’s always a chance that the object is null. If you don’t check for it, you’re just asking for a NullPointerException. So there are two ways to handle this. Either check for null and then call the equals method if the String is not null, or turn around the logic and call the equals method on your String literal (which you know is not null). Both work fine. The latter saves you a null check and simplifies the conditional logic.

    This standard can be enforced in JTest by enabling the PB.ISEM rule.

    I haven’t found a rule in Checkstyle to enforce this. If anyone knows of such a rule, or a similar rule in another coding standards tool, feel free to post it in the comments.

    See Also:


    Automate Your Coding Standards Checks


    Resources:

    JTest is made by Parasoft.

    http://www.parasoft.com/

    Checkstyle is written by Oliver Burn and is an open source project at SourceForge.net.

    http://checkstyle.sourceforge.net/

    Effective Java Programming Language Guide is a book that deals with coding standards and best practices in Java. It is available at Amazon.com.

    Technorati Tags:

    h1

    Automate Your Coding Standards Checks

    January 24, 2007

    While developers wish the whole world were Agile, it simply is not the case. I work for a company that does work for the government and our customer contractually obligates certain processes and even goes so far as to prohibit companies from bidding on projects unless they follow these processes. One of those involved coding standards. At first that didn’t sound all that bad. After all, most large companies have to impose some sort of standards and there are many good reasons to do so. The headache came when I discovered how they wanted us to enforce them. We were given an Excel spread sheet that listed dozens of standards and we were required to fill one out for each piece of code written. Worse yet, the standards were cross-language and obviously written by C programmers. As a result, we had to translate the standard from C to Java and/or decide whether it applied at all. Then you had to read the code, keeping all the standards in your head, and sign off that it met them all. If even the smallest bit of code was changed later you’d have to go through the entire checklist again. It was painful and absolutely killed productivity.

    After filling out a number of these checklists and hating every minute I decided that there had to be a better way. This is the kind of tedium that computers are made to handle. Why should I have to spend time doing such a mind numbing processes when a computer could do it better anyway? I’m bound to miss things. I’m bound to get bored. I’m bound to just check off the list and sign it because I’m’ tired of the whole damn thing.

    Thankfully there was some money in the budget for tools and so I started looking around to see what could alleviate my headache. I came across a great Eclipse based product from Parasoft called JTest. You can either buy it as a stand-alone IDE or as a plugin for Eclipse. It does automated generation of JUnit unit tests, runs those tests while reporting code coverage and has a collection of more than 400 coding standards that can be enforced with the check of a box. The nice thing is that all of them include an example of the violation of the standard as well as an example of how the violation can be rectified. Beyond that, it has a justification for why the standard is a good idea and references to authors like Joshua Bloch and others who have written about the standard. This is extremely helpful in deciding whether the standard is one that you want to follow or not.

    After we got JTest installed I sat down with a co-worker and went through every standard in the list and checked as many we thought we could possibly stand. Over the next couple weeks of coding we had to tailor this list a bit as we found that we had standards that contradicted each other. We also found that some were so annoying that they just had to go. By the time we were done, we had covered everything that was in the Excel spreadsheet and a whole lot more. Our process still required that we fill out the form, but now that we had the automated standards, we simply pre-filled the form and if the code passed the automated test, then we filled the details of what code was being reviewed, the date and the reviewer and that was all. This was an immediate boost to productivity.

    Many months later I started looking into some open source coding standards tools. While I found some tools that had promise, they just weren’t up to par with what I was getting in JTest. That is no longer the case. There are some very significant open source tools to do automated enforcements of coding standards. One of the more popular ones is called Checkstyle.

    JTest has two advantages over Checkstyle. First, JTest has significantly more pre-defined coding standards than Checkstyle. Both allow for defining your own standards and tailoring existing standards with various options including regular expressions. Still, it’s nice to have a pre-defined set so you can spend your time coding instead of defining coding standards. Second, JTest has an auto-fix feature that is paired to many of the standards. What that means is that for many of the simpler standards you can simply click on the coding standard violation, select Quick Fix from a popup menu and JTest will fix the violation automatically. Very nice.

    Checkstyle two advantages over JTest. First, the cost. Checkstyle is open source and free. JTest is a closed source, commercial product and is not cheap. In many corporate environments this may not be a problem as it’s cheaper than other commonly purchased tools and there’s a perception that you simply buy what the developers need and don’t mess around with a cheaper tool that the developers are going to have to fight against and spend hours getting to work properly. There’s some truth to this, but with the exception of having to create coding standards rules for Checkstyle that might otherwise come with JTest, Checkstyle takes no longer to get up and configured than JTest does. Second, Checkstyle integrates into almost any developer tool you can think of and new integration plugins are being written for it all the time. When I first started using JTest it integrated into Eclipse and well, Eclipse. Now they’ve started expanding that list a bit, but it’s still not integrated with as many tools as Checkstyle. Worse yet, if you buy JTest and use it for coding standards in your IDE, you’ll most likely want to use those same coding standards in your automated builds to generate reports and status for the project as a whole, but JTest does not support this without an additional purchase of a even pricier JTest Server tool that supports command line builds. At the time of this writing there are Checkstyle integration plugins for Eclipse, Websphere Studio Application Developer (WSAD), IntelliJ, NetBeans, JBuilder, BlueJ, Emacs JDE, jEdit, Vim, Centipede, Maven and Ant. The wide-spread plug-in support makes it fit nicely into most any pre-existing development environment.

    From the text above it may sound like I’m slamming JTest pretty hard. In some cases I am and the criticisms are justified. But it has to be taken into account that JTest is much more than a coding standards tool. It does automated generation of JUnit tests which is a incredible timesaver for augmenting developer generated test cases. It often finds cases that the developer missed and generates tests for a bunch of the cases that the developer knows that they should right tests for, but don’t because they’re so tedious to write. For instance, if a method takes an int, JTest will generate tests that call the method with large negative numbers, small negative number, large positive numbers, small positive numbers and zero. They are offering an IDE, based on Eclipse, in which things work well together and in this respect they’ve done well. While I’m always looking at open source solutions and there may be a day when there are open source ways of doing everything that JTest does, we’re simply not there yet. In the meantime, Parasoft offers a respectable product line and should be strongly considered if you’re in the market for a commercial IDE with some significant unit testing and coding standard features.

    Regardless of whether it is JTest or Checkstyle that meets your financial and functional needs, I highly recommend looking into some sort of automated enforcement of coding standards. It relieves the developer of the tedium required for manual evaluation of adherance to coding standards and can contribute to an overall improvement in code quality.

    Joshua Smith

    Rational Pi Blog – https://rationalpi.wordpress.com/


    Resources:

    JTest is made by Parasoft.

    http://www.parasoft.com/

    Checkstyle is written by Oliver Burn and is an open source project at SourceForge.net.

    http://checkstyle.sourceforge.net/

    Effective Java Programming Language Guide is a book that deals with coding standards and best practices in Java. It is available at Amazon.com.
    Additional Java Coding Standards Tools

    PMB

    http://pmd.sourceforge.net/

    Find Bugs

    http://findbugs.sourceforge.net/

    JLint

    http://artho.com/jlint/